“Art of Engraving” by James Meeks is a top notch summary of engraving and is currently on sale at Brownells. Orders from GRS over the next 3-4 weeks will receive a 10% discount. Make sure to speak with the sales rep consulted when purchasing the student tool set. The Firearms Engravers Guild has a show every year in Las Vegas about the third week of January.
The hammer supplied in the kit from GRS has a fairly thick handle. Thinning this with sandpaper is recommended to improve the flexibility and feel. Mike uses a pin in his hammer that when used sits between the middle and fourth fingers. This serves as a fixed reference to always orient the face of the hammer correctly. The hammer is lightly held between the thumb and forefinger. The other three fingers are used to move the hammer. This is a chasing hammer, not a claw hammer or a ball peen hammer. It is moved quite differently to tap the graver in a very controlled manner. The wrist does not move! The forearm and elbow do not move!
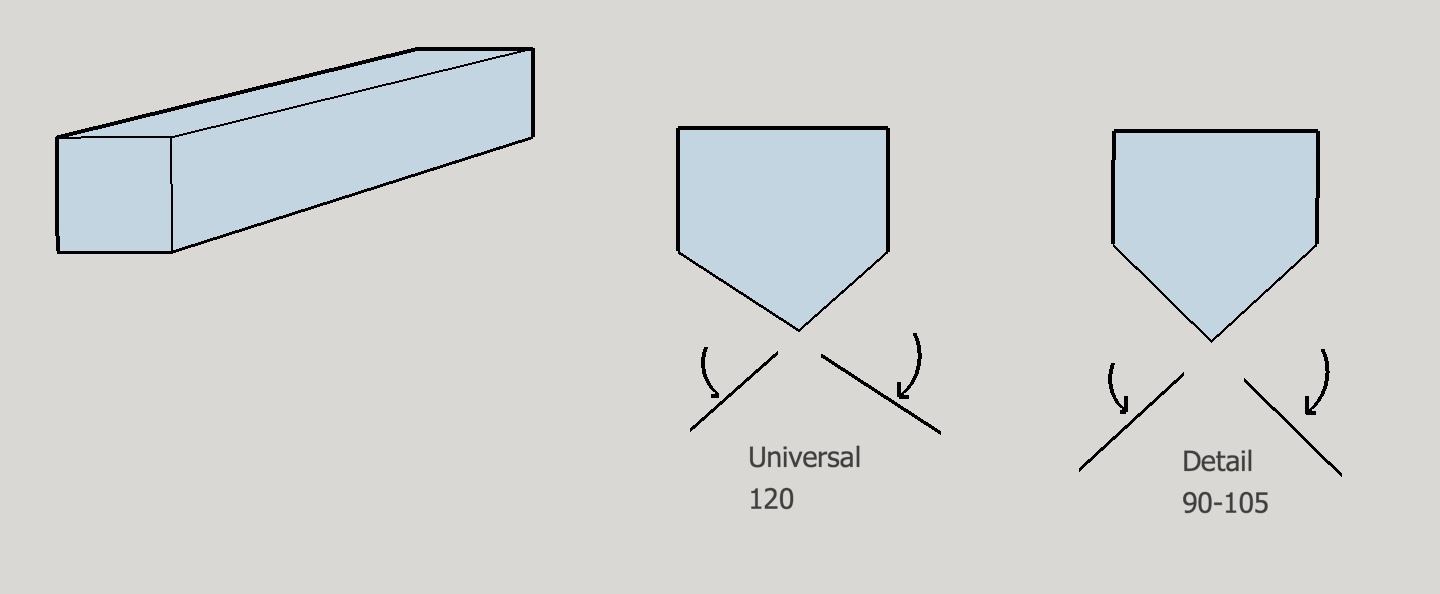
A 90° and a 120° gravers came with the kit. They were neither sharpened nor completely roughed out as delivered. In addition some gravers supplied were not roughed out correctly as their points were not centered. The 120• graver is referred to as the universal graver and the 90° graver as the detail graver. The angles do not have to be precisely 90 or 120. For instance the 90 can vary from 90 to 105. The 120° degree graver can cut both fine and thick lines. The 90 is more limited in width of line cut.
A flat graver is usually used for big, wide, bright cuts. To use it start on an outside point, roll to the inside as cut progresses to include more metal and then roll back out as the cut finishes.
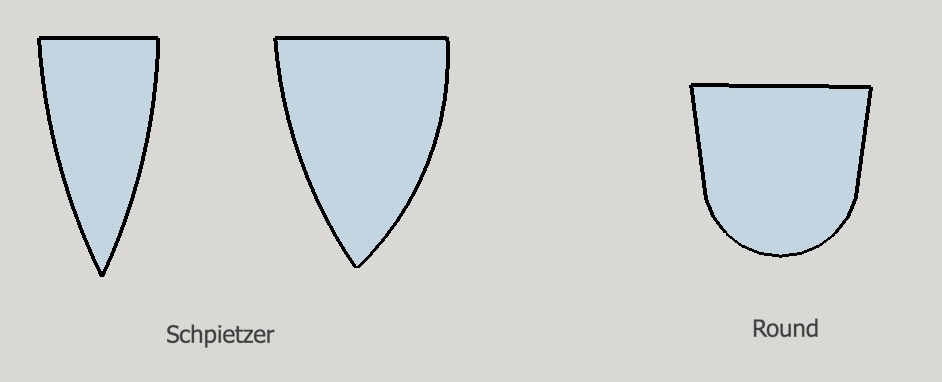
An engraver geometry used to the exclusion of other graver geometries by many master engravers is called the schpietzer (or onglette). It is rounded on both sides and comes to a point. It is ground to a variety of widths. There is also a round bottom graver used mostly for inlaying precious metals.
Engravers are made from high speed steel, HSS, tool steel (M41, M42, …) and carbide. Some of the tool steels have trademarked names, e.g. Cronite.
Sharpening the Universal and Detail tools is made simpler with sharpening jigs available from GRS and Lindsay. The Lindsay sharpening system was used in class. The uniform parallels ground at the very tip of the graver (as shown below) did not use to be ground parallel to the edges of the tool. Two critical components of grinding these gravers are that the rough 90° or 120° ground faces must converge at the center of the graver. Also, the uniform parallels must be identical or the graver will turn when used.
Using the Lindsay jigs requires that the grinding surface be 1/2” above the surface that the jig slides on. Lindsay diamond hones come 1/2” thick. Similarly a power hone (discussed below) comes with the appropriate height for this sharpening system. The back side of these two gravers are shaped as well providing a better view of the cutting face. After cutting the new faces on the graver it must finally be polished with a few strokes on a diamond dust impregnated leather surface. This is accomplished by spraying a suspension of diamond dust on the leather, letting it dry and taking three or so strokes across the leather pad on three faces: the top or 45° angled face, and each of the two uniform parallels.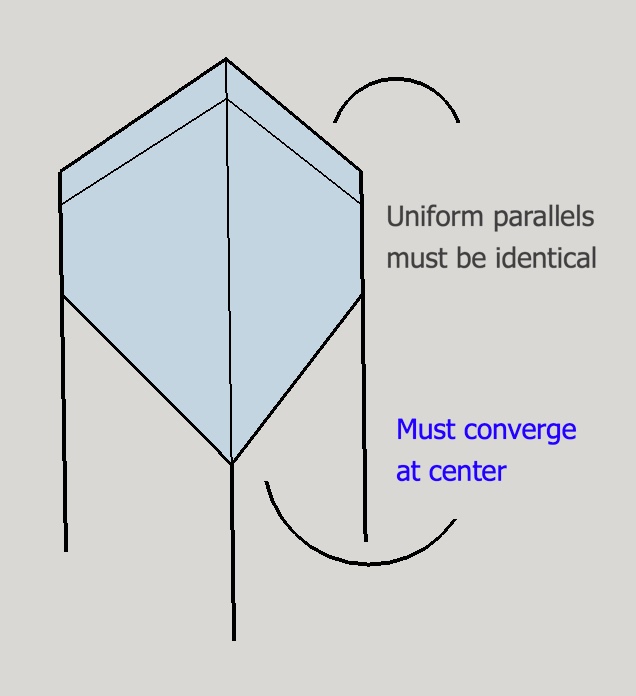
A final adjustment before using the graver is “dubbing” the point or blunting it slightly. This strengthens the point, increasing wear about 30%. It makes the chips come straight up from the graver with minimal curl, so the chip stays out of the line of sight. It is only done on point gravers, e.g. universal, detail, & schpietzer. An Arkansas stone can be used for dubbing, but the ruby stone is standard. A grit finer than 1200 should be used. To dub the tool it is held vertically and lightly stroked across the stone in the shape of a ‘W’ that has 1/8” legs.
A flat or wedged-shaped graver is mounted in the clear Lindsay template without the indexing pin. Only the face is sharpened and this face must be square. It is polished on the flat face with the diamond dust impregnated leather.
Students used a Shop Fox vise which is an imported version of a Wilton Versavise. Both are known as parrot vises. This vise requires constant loosening, rotating and retightening to keep the work in the appropriate position for engraving. More ideal is an engraver’s block. The Magna Block is the vise sold by GRS for this purpose.
It is often best to mount the metal to be engraved on a small block of wood with double sided tape. This allows for firmer work holding than the thin sides of a plate. It can also elevate the workpiece above the vise jaws if needed. Mike recommends Sure Tape available at Lowes or findtape.com.
A three LED desk lamp is recommended to provide sufficient lighting. Using one that has a chromed grid or diffuser is ideal as there are no shadows. The goal is to provide sufficient light even under the magnification of the Univisor, while minimizing shadows and reflections from the metal surface and graver.
The graver is held firmly in the hand across the palm (left hand for right handed engravers). The thumb should be pressed against the side of the graver handle. With the exception of the thumb this is very similar to holding a wood chisel. The little finger should wrap around the sleeve on the graver. Gravers are held in a quick change (QC) collet in a handle. To improve holding and comfort a sleeve on the graver is recommended. An ideal source of sleeves is silicone fuel line (for model cars and planes). The graver is held at an angle to the metal to be engraved larger than 15• and after starting the cut this angle is quickly reduced to the ideal 15°. After making the cut using repeated taps with the chasing hammer the angle of attack is further reduced and with one tap the chip is cut off (chipped out). The graver is lubricated as needed with Oil of Wintergreen usually kept on a cotton ball in a watch box or other small container.
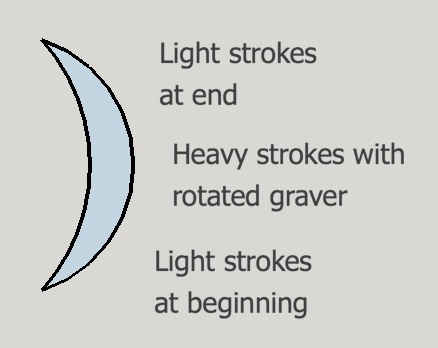
A style of cut called the “Cat Claw” commonly used in “Western” style or “Bright Cut” style begins thin with light slow strokes. The strokes become heavier as the tool is rotated and the graver is slightly rotated to the outside of the curve by about 3°. Near the end chasing returns to light slow strokes as the cut finishes and the final chip is ‘popped’ out.
The Cat Claw can be made curving right or left. For right handers curving this or other cuts to the right brings the hammer closer and closer to the body. This close proximity can be relieved by bending at the waist and/or holding the hammer increasingly vertical while striking. A similar approach is appropriate for left handers cutting a right curving stroke. For right handers cutting a right curving stroke start with the hammer vertical under the chin and move away from the body with the hammer increasingly horizontal as the cut progresses.
Orienting the graver at the beginning of the cut is important. One way to make sure you have the best control while aligning your graver on the correct spot is to use a “steady rest”. This can be the heel of your hand resting on the block or the thumb of your hand on the block. Sometimes a thumb to thumb steady rest will also be helpful, especially for straight cuts.
Cutting a dot consists of pushing the corner of the flat blade into the metal and turning the workpiece or moving around the workpiece without the hammer. The number of complete revolutions around the center of the dot will establish its size. If making multiple identical dots, use the same number of revolutions.
Also cut with the flat (or wedge-shaped) graver is the “wriggle” cut. This is accomplished by pushing instead of chasing. Wriggle cuts can follow either straight or curved lines. The holder is held in the palm and the graver is pinched between the thumb and the forefinger. Take care not to reenter on a chip as the graver will slide across the work surface. The wriggle cut is done by pushing the point of the graver into the work and while pushing forward along the intended path, rocking the graver back and forth. This rocking is accomplished by turning the wrist with the elbow in a fixed position. The degree of turn to the right and left must be the same. The greater the degree of turn the ‘looser’ the wriggle. The points of the ‘wriggle’ are somewhat emphasized. The tool is normally held at 35•. Western bright cut scrolls are often formed with a wriggle cut. When using the pushing handle it can be flattened on one side for improved clearance.
The tool is held in your dominant hand and the other hand manipulates the block. The block is turned with the whole hand. Never finger turn a block! Turn the block, stop when you begin to feel uncomfortable, readjust the block, and start cutting again. The hand holding the graver never changes position during a long cut. Never remove the tool from the cut. Unlike using a vise the work moves past a steady cutter held tight to a flat surface. Fingers should not be used to turn the block as they provide insufficient control.
The metal is first coated with China white. The finger is wet with saliva and rubbed on the block of China white. This “paintbrush” is then rubbed around the metal surface creating a slightly cloudy or hazy appearance. A fine pencil is then used to draw the design on the metal. The pencil lead that came with the set is 0.3 mm. Mike uses a 0.5 mm lead. For large designs it may be necessary to spray artist’s fixative on the design. This will keep you from accidentally wiping off the design during cutting.
Transfers can be purchased from a variety of sources including Mike’s transfers designed for specific firearms. They can also be designed on the computer and printed out with an inkjet printer. The design must be printed in reverse on overhead printer transparency. Printing must be done on the mucilage side. Transfer fluid (such as Transfer Magic) can be made from Damar varnish, available in art stores, diluted with isopropanol (9:1 isopropanol:varnish). The transfer fluid is painted on the metal with a Q-tip and allowed to dry for a few minutes. The transfer paper is laid on, ink side down and burnished with a burnishing tool. The paper is removed leaving a fairly resistant design on the metal ready for engraving. There is some variation with different inkjet composition. When cutting is complete remove the varnish with denatured alcohol.
Engraving patterns can also be transferred from a completed engraving to a new one or from one part of an engraving to another. The following is a recipe based on Mike’s experience that is consistently successful. Scott Magic Matte Tape (preferentially 1” wide) and Chapstick (classic original) are the key items that have been shown superior to substitutes. First the wax is rubbed into the engravings so as to fill the cuts. On brass the wax should be rubbed vigorously. This darkens the wax and provides a much clearer and dark transferred design. The backside of a piece of tape, the slick side, is rubbed over the design to remove excess wax outside the cuts. Then a piece of tape with one end folded over is laid onto the image to completely cover it and picked up. One end of the tape is laid sticky side up on the bench and a small piece of tape is used to hold down the unfolded end. The taped end keeps the tape from moving during transfer to the next piece of tape. Another piece of tape is laid on the new surface to be cut, removed and discarded cleaning the surface. The image is now on one piece of tape, but needs to be inverted. A new piece of tape with one end folded is gently laid on the image sticky side down. After carefully grasping the folded ends the two pieces of tape can be separated. The reversed image containing tape is then laid on the cleaned metal surface sticky side down. Use a small piece of tape to hold one end down to the metal surface. Rub the top of the piece of tape with the image briskly, but lightly all over. Gently lift the tape to check the image (thus the value of taping one end down). Remove the reversed image by grasping and pulling the folded end. This reversed image can often be used 2 or 3 times.
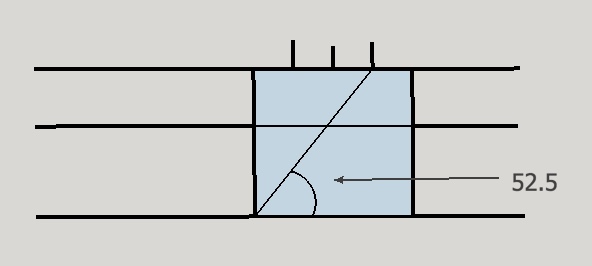
Use professionally designed fonts. Always remember that everyone can recognize bad lettering. The most important part of lettering is ensuring the spelling is correct. Always double check spelling! A nice font to use is Edwardian, a script font. Draw lines to define the top and the bottom of the capital letters. Lower case letters should be about 2/3 as tall as capitals for block letters and slightly smaller for script. The correct angle for script letters is 52.5°. This angle can easily be found by drawing a square, dividing the top edge into fourths and drawing a line from the 3/4 mark on top to the bottom left corner as pictured below.
Use a wide flat for letter verticals and a narrower flat for horizontals in block lettering. Block letters can also be cut wth a wriggle cut.
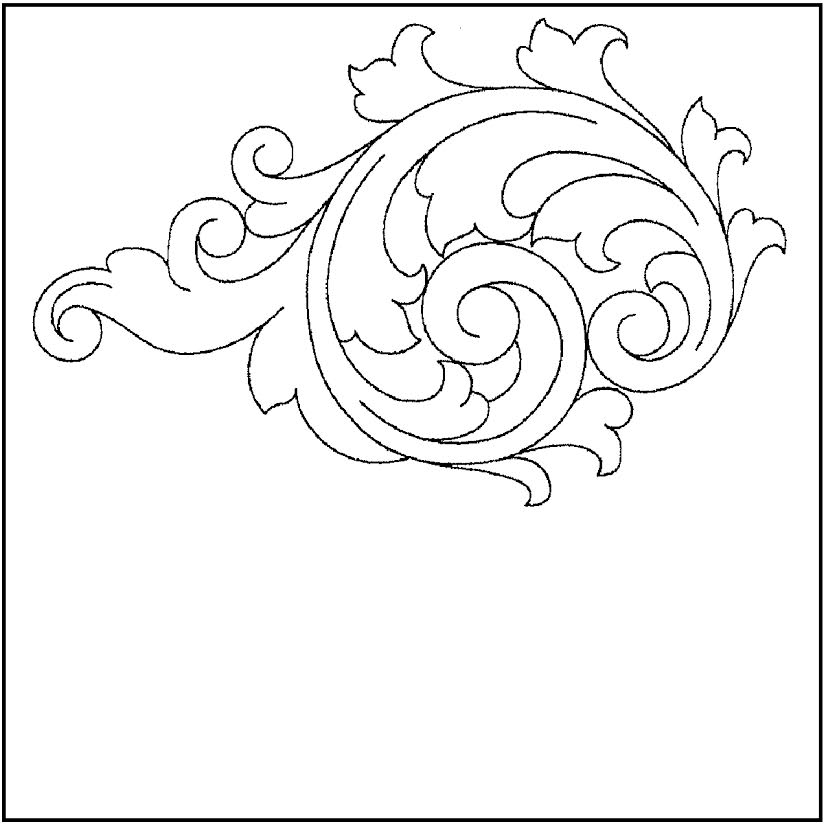
Scrolls were used by the Greeks to decorate their weapons. The scroll form is based on the nautilus shell, where the scroll can be seen complete by cutting the shell in half. (Mathematicians call this the logarithmic spiral.) A diagram of this scroll is depicted below. The backbone of the scroll needs to be large enough to accommodate the detail inside. Just inside the backbone you can clearly see a visual open space that is left empty. Nothing touches the scroll from the inside! The goal is a balanced scroll pattern with leaf structure and negative space. The negative space should be 1/3 of the total or less so as to not overpower the scroll work.
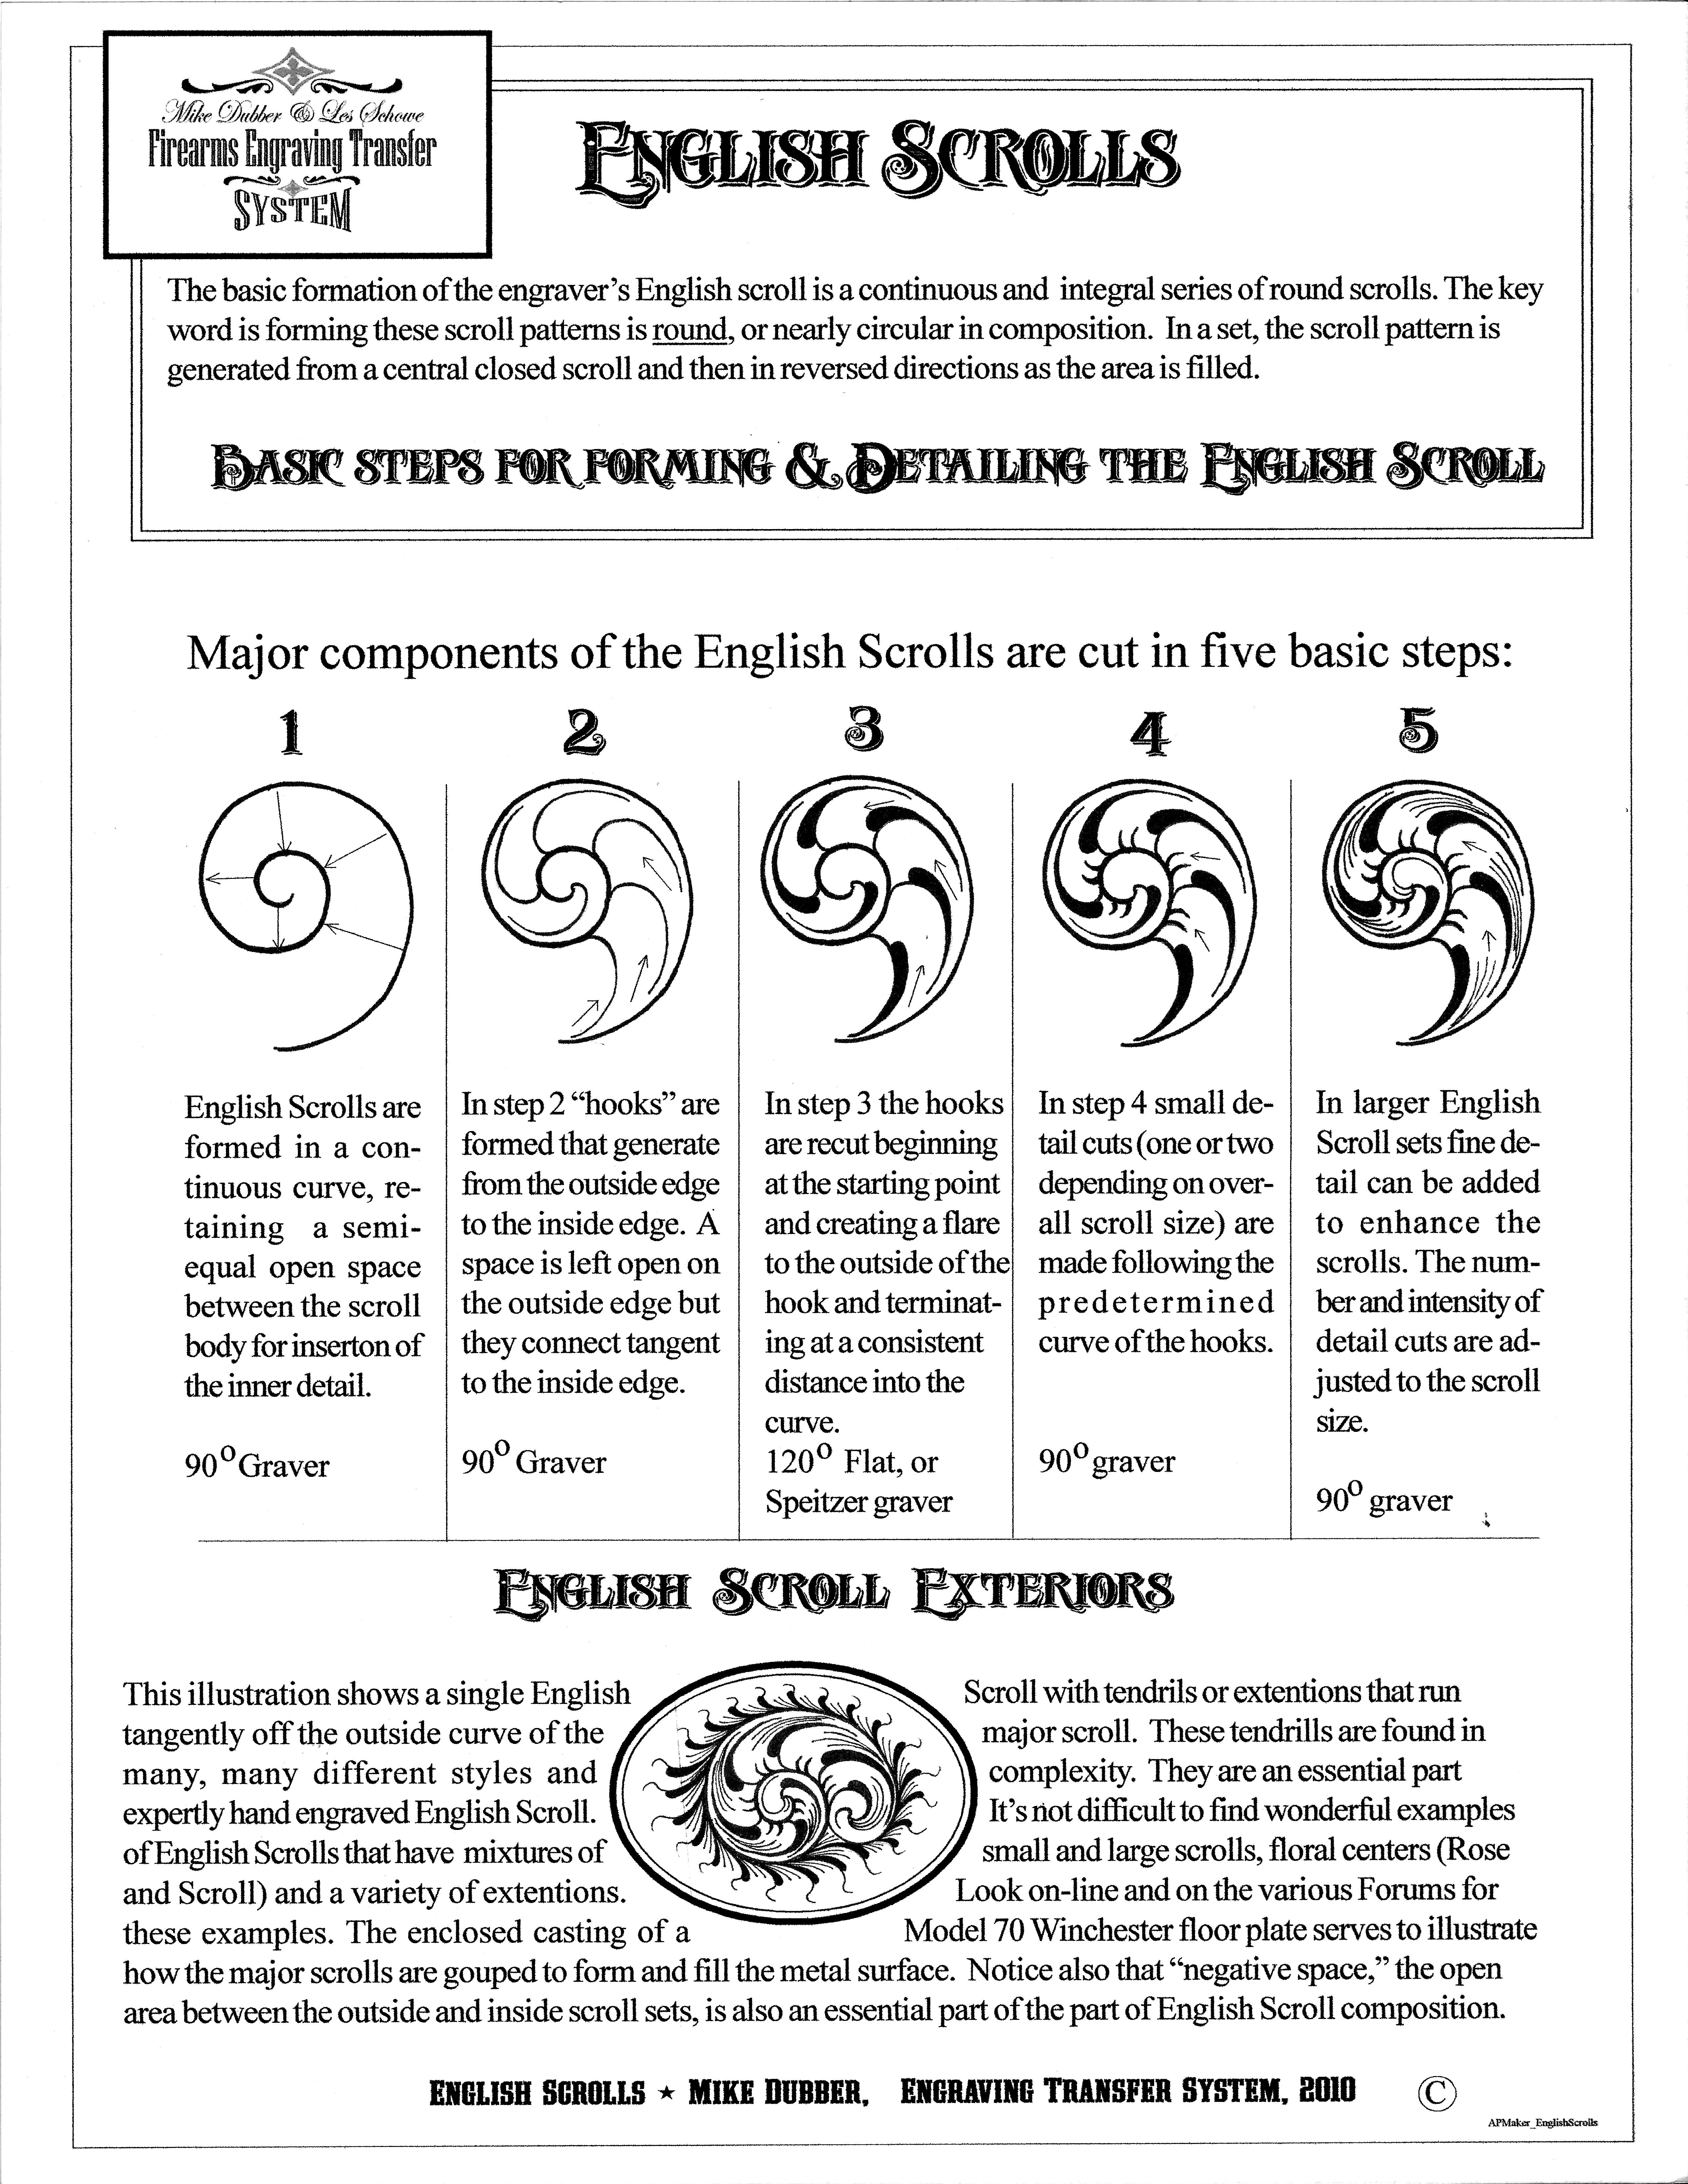
Pictured is a set of steps for forming an English scroll (from Mike after the class).
This is one of the three important techniques to master along with scroll work and border design, followed by quality of the detail and composition. Every dot is an individual. This means that no dot should invade another dot’s space. Open space between dots should be minimized. The dots should be tangential to one another, but open space is better than overlapped. The punch is held vertically in a sleeve between the thumb and two fingers, placed against the work and tapped twice, once to set the punch and a little more forcefully a second time to make the dot (or circle). Common punch sizes for firearms are 4, 5, and 6. Different sizes should should not be mixed. The punched area presents a darker surface relative to the brighter cuts from gravers. Consequently, dot punching is used to elevate the brightness of the scroll work. Silicone fuel lines make the best sleeves for dot punches. The dot punch can also be used tilted for half-moon detailing.
Dot punches also known as beading tools are can be used for setting stones. Once a stone has been set into a hollow in the metal, a chip is created near the edge of the stone. The bending tool is then hammered down on this chip creating a bead that overlaps the edge of the stone and along with other beads holds the stone in place.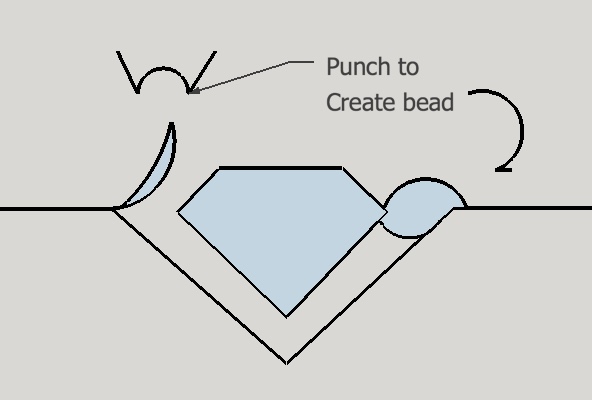
This narrow pie shape cut is made by entering the work surface and continuing at the same angle to the end of the cut. Thus the cut deepens and widens as the cut progresses producing a wedge. This can be used for instance as a number of wedges all emanating from the same point to create a flower-like shape.
The block needs to be cleaned regularly. Remove the set screw and pull out the spring and brass plunger. The jaws cannot be reversed so label them prior to removal. The jaws can then be removed as well as the long screw holding them. A bearing lies flat under the vise jaws and can be lifted off. Grit collects on this bearing surface (raceway). Wipe off and grease this raceway, the face of the internal bearing, the top bearing race, and the shaft. Wipe off the brass plunger (pin). The T-slot should be cleaned with a brush. The jaws and especially the holes in the jaws as well as the screw should also be cleaned. Do not lube the screw as that will collect chips. Just use a drop of oil on the screw carriage in the middle of the block. Replace the jaws so they both start on the screw at the same time, otherwise they will not close in the center of the vise. The pin goes back in with the slant pointing up to engage with the slanted surface on the shaft. The block should be cleaned at least every 6 months.
The air powered hand tools also need to be cleaned. No oil should ever be used on these tools! Use denatured alcohol to clean them. Get rid of any excess alcohol. Run a Q-tip (damp with alcohol) through the barrel. Clean the piston (& spring if present) and reassemble. Make certain the piston is not put back in backwards.
Diamond hones can be cleaned with “PB Nut Blaster”. Be sure to get the spray cans that say “The Original Nut and Bolt Buster”.
| Company | Tool | Price | Comments |
|---|---|---|---|
| GRS Tools | |||
| Gravermax G8 | $1340 | Has fine control, two handpiece ports, additional air port | |
| Graversmith | $869 | Does not have fine control over air pressure and only one port | |
| 901 Handpiece | $299 | Medium power (Monarch for less power and Magna for more power) | |
| Magna Block | $658 | Includes jaw plates (low profile is for use under microscope & needs lazy Susan table) | |
| Power Hone | $500 | Plates are included in various packages; single speed | |
| Dual Angle Sharpener | $300 | ||
| Thermolock | Hot melt plastic for complex work holding; reusable | ||
| Diamond spray | For leather pad | ||
| Lindsay Tools | |||
| Classic | $1375 | Foot control, includes handpiece | |
| Palm Control | $2770 | More difficult to control and not recommended for beginners | |
| Sharpening Templates | $295 | Easiest way to sharpen 3/32” square gravers; includes 4 templates and stones | |
| Goliath Vise | $630 | Stainless steel so it won’t rust; includes jaw plates; smaller and larger blocks available | |
| T Mitchell | |||
| Enset | $1500 | Includes handpiece; can decrease rate down to 1 tap | |
| Leica Microscope | Has best depth of field at 2.5” | ||
| T White | |||
| Powerhone | $687 | Variable speed; comes complete with 1200 & 280 wheel | |
| Transfer sheets | |||
| Transfer Magic |
| Item | Comments |
|---|---|
| Silicone Fuel Line | Sleeves for gravers; available in remote control car/plane shops; use different colors for different types of gravers |
| Oil of Wintergreen | For lubricating graver |
| LED Desk Light | Need a good source of light; preferably with diffuser to eliminate shadows |
| Rare Earth Magnets | Glued to top of power hone to capture metal dust |
| Sure Tape | Double sided tape for holding metal sheet to wood block |
| Air Compressor | Need an oil free compressor or must use a coalescing filter; should always use a water filter |
| Site | Comments |
|---|---|
| Rio Grande Jewelry Supply | small hand tools, jewelry, precious metals |
| MonsterSlayer | many different resources for engravers |
| Letterhead | great source of fonts for engravers and also displays the artistry of good font design |
| Cronite | source of good gravers and other supplies |
| DMT | good source of diamond hones for sharpening |
| Solid Professor | has free training for the free Autodesk fusion CAD program |